# 概述
欢迎使用NOVPROXY
[NOVPROXY](https://novproxy.com/)作为专业的全球代理服务平台,致力于为用户提供高匿名性、高安全性的网络代理解决方案。其核心优势包括:
1. **智能IP代理池**:动态覆盖全球多地区IP资源
2. **全场景适配**:精准匹配数据采集、社交账号管理、市场调研等业务需求
3. **安全防护体系**:通过IP轮换等技术有效规避封禁风险
4. **开发者友好**:提供标准化API接口,支持快速集成
[NOVPROXY](https://novproxy.com/)有多种类型套餐供用户选择:[动态流量](https://novproxy.com/zh/pricing/residential-ip/)、[长效静态ISP](https://novproxy.com/zh/pricing/isp/)、[无限流量-端口](https://novproxy.com/zh/pricing/unlimited-ip/)、[无限流量-带宽](https://novproxy.com/zh/pricing/unlimited-ip/?type=1)
# 动态流量使用教程
通过有价格优惠的流量包套餐能节省很多流量成本。
[账密模式](/help-center/help-center/dynamic-traffic-usage-tutorial/zhangmi)
[API模式](/help-center/help-center/dynamic-traffic-usage-tutorial/api)
# 账密模式
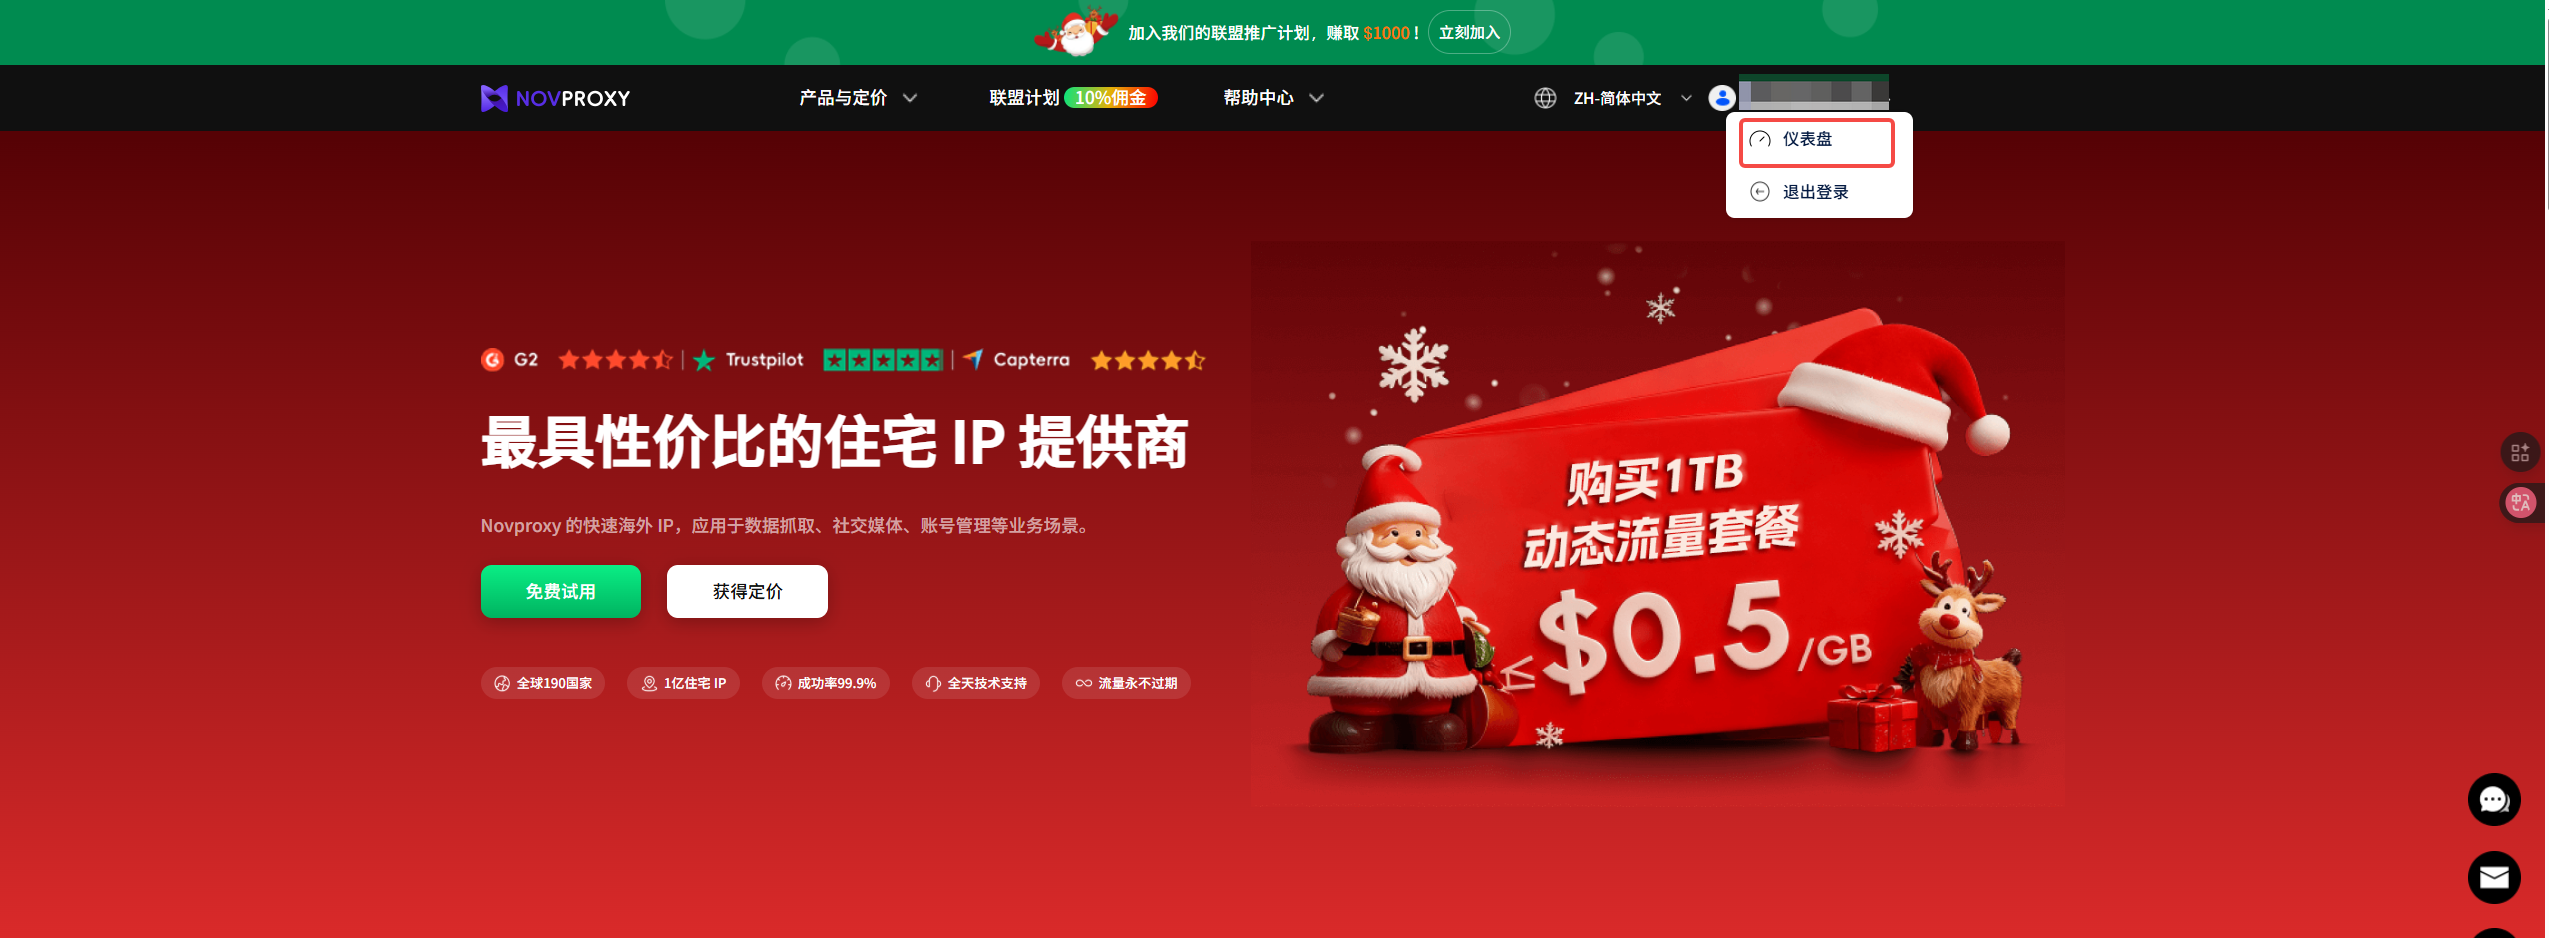
1、进入操作台(Dashboard),点击菜单动态流量-账密模式
2、选择相对应的国家、州省、会话类型等条件,其中会话类型有**Sticky IP**(粘性IP)和**Rotating IP**(轮转IP)两种类型
**Sticky IP**(粘性IP):在规定时间内目的IP不会更改,当超过设定时间后IP自动更改为同条件下其他IP,同一IP地址可支持长达**1**20分钟会话。
**Rotating IP**(轮转IP):每次请求都会用一个新的IP访问目的地址
3、选择转发机器(主机名:端口)和用户名,不同地区的转发机器对于代理效果有不同的影响,通常选择距离目的IP较近的地区或者距离使用代理的用户所在地较近的地区
4、设定完转发机器及用户名后,可以根据下方测试命令在“**命令提示符**”中测试是否可以正常使用
5、使用时复制代理所需的主机:端口、用户名、密码具体信息配置在指纹浏览器或支持HTTP、Socks5代理的程序里即可,也可直接生成特定格式的代理,复制到指纹浏览器中粘贴会自动适配
如果考虑多实例并发运行,则可以根据实际场景设置生成多个代理信息,未使用不额外扣费
6、子账户设置
在高并发执行任务、多场景、员工管理等实际需求下,子账户的逻辑显得尤为关键
根据业务需要创建子账号需注意以下几点
1.账号密码都必须满足6-22位且包含数据和字母的组合
2.分配的流量不得高于当前账号下流量剩余总量
3.为避免账号丢失、被盗窃等情况,建议定时更改子账号信息
4.子账户在使用设置里的用户名选项中使用
# API模式
1、进入操作台(Dashboard),点击菜单动态流量-API模式
2、把本机IP或需要授权的IP地址加入白名单,可点击\[一键加入白名单],可快速加本机IP。或者点击\[白名单列表],再点击\[新增白名单],输入需要授权的IP地址,点击\[确定]。
3、配置国家地区、返回格式、会话类型、提取数量后,点击\[复制]就可以使用了。点击\[打开链接],就可以在浏览器里看见返回的IP了。
# 长效静态ISP使用教程
静态IP是一种固定的、不会改变的IP地址。
1、进入操作台(Dashboard),点击菜单长效静态ISP,可以看到已购买的静态IP,如果没有请先购买
2、使用需要先提取IP,如图
3、已经提取的IP会出现在下方使用记录里,点击使用,选择要复制的账密格式并点击复制按钮将IP:端口、用户名、密码复制到剪切板中粘贴到指纹浏览器或支持HTTP、Socks5代理的程序里即可使用
# 无限流量使用教程
无限使用住宅IP,不限制流量和IP数量,无需担心消耗多少流量,降低数据抓取的成本。
NOVPROXY支持两种模式:
1.[带宽套餐](/help-center/help-center/unlimited-traffic-usage-tutorial/bandwidth-package)
2.[端口套餐](/help-center/help-center/unlimited-traffic-usage-tutorial/port-package)
# 带宽套餐
全球国家随机分配,自定义IP时效,固定带宽使用,机器配置根据带宽分配。
#### 账户密模式
1、进入操作台(Dashboard),点击菜单动态流量-带宽套餐,可以看到已购买的套餐
2、选择需要的主机名:端口、国家地区、会话类型,其中会话类型有Sticky IP(粘性IP)和Rotating IP(轮转IP)两种类型
Sticky IP(粘性IP):在规定时间内目的IP不会更改,当超过设定时间后IP自动更改为同条件下其他IP,同一IP地址可支持长达120分钟会话。
Rotating IP(轮转IP):每次请求都会用一个新的IP访问目的地址
3、设置结束后,可以根据下方测试命令在“**命令提示符**”中测试是否可以正常使用
4、使用时复制代理所需的主机名:端口、用户名、密码具体信息配置在指纹浏览器或支持HTTP、Socks5代理的程序里即可
# 端口套餐
可选择指定国家IP,粘性时间范围3-30分钟。
#### 账密模式
1、进入操作台(Dashboard),点击菜单动态流量-端口套餐,可以看到已购买的端口
2、点击编辑,设置需要的用户名、密码、国家/地区、轮转周期、格式,点击确认修改
3、使用时复制主机名:端口、用户名、密码或复制代理命令,粘贴到指纹浏览器或支持HTTP、Socks5代理的程序里即可
#### 白名单模式
1、点击白名单模式
2、点击编辑,输入需要授权的IP地址(支持批量添加,多个IP通过逗号分割),点击保存
3、添加的白名单IP无需进行用户名和密码的校验,只需要配置主机名和端口即可使用代理
# 指纹浏览器如何使用
指纹浏览器(Fingerprint Browser)是一种用于保护用户隐私、掩盖网络行为或绕过某些限制的工具。其核心概念是浏览器指纹(Browser Fingerprint),即根据浏览器及设备的一些独特信息(如设备型号、操作系统、浏览器版本、语言、屏幕分辨率等)生成的一个“指纹”,通过这种方式可以唯一标识用户。指纹浏览器的主要作用是伪造或隐匿用户的真实浏览器指纹,以此达到保护隐私、反追踪的目的。
[AdsPower指纹浏览器](/help-center/help-center/fingerprint-browser/adspower)
[比特浏览器](/help-center/help-center/fingerprint-browser/bite)
[Dolphin Anty](/help-center/help-center/fingerprint-browser/dolphin)
[Hubstudio](/help-center/help-center/fingerprint-browser/hubstudio)
[拉力猫指纹浏览器](/help-center/help-center/fingerprint-browser/lalicat)
[Undetectable指纹浏览器](/help-center/help-center/fingerprint-browser/undetectable)
[Xlogin指纹浏览器](/help-center/help-center/fingerprint-browser/xlogin)
# AdsPower指纹浏览器如何使用NOVPROXY
1、打开AdsPower,点击左上角“新建浏览器”,在右侧代理信息栏选择代理类型,其中可以选择HTTP或Socks5
2、根据NOVPROXY配置对应的“主机:端口”、“代理账号”、“代理密码”信息,点击“检查代理”会出现测试结果
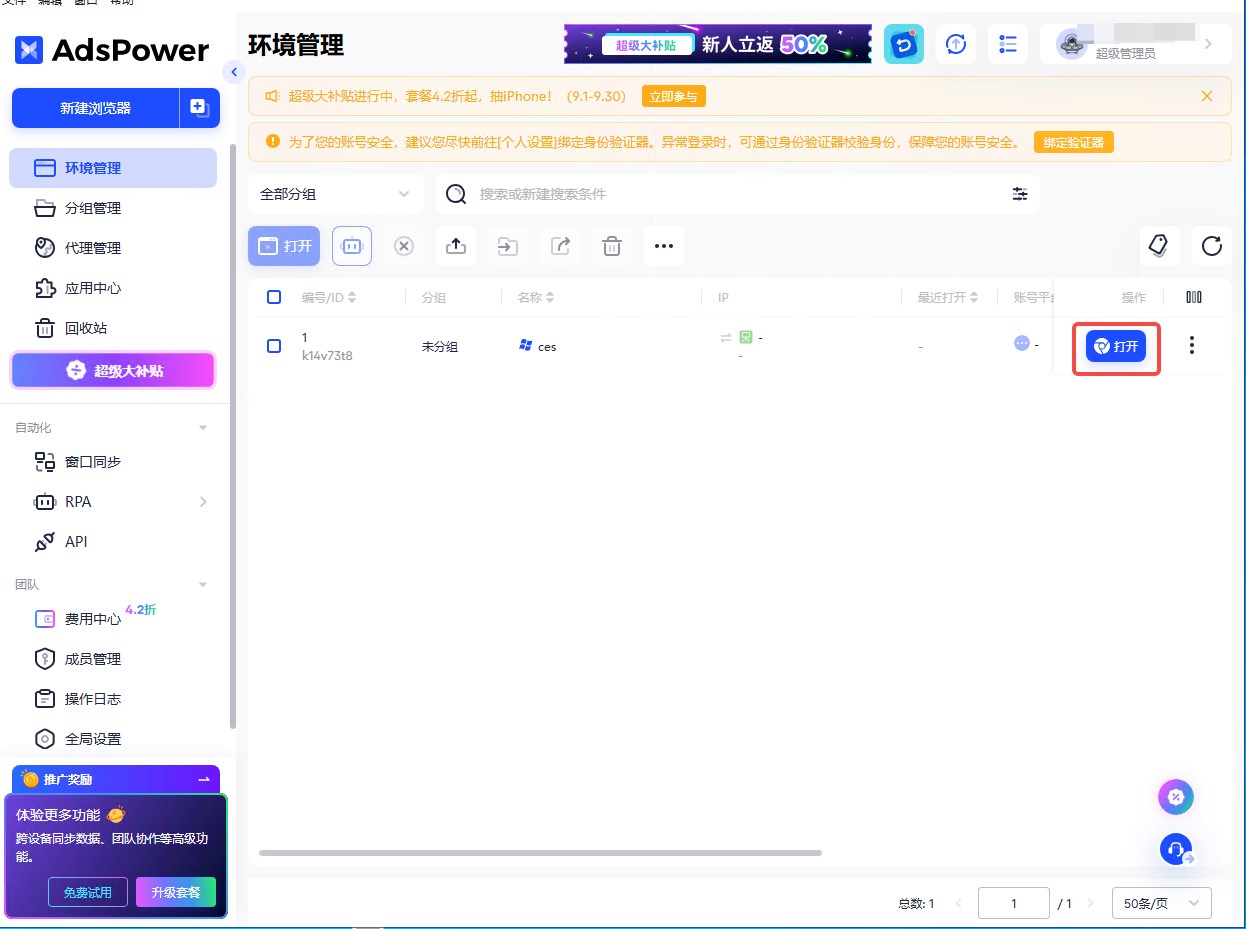
3、添加完环境后主页会增加一条记录,点击右侧“打开”按钮则会开启一个新的浏览器窗口
# 比特浏览器如何使用NOVPROXY
1、打开比特浏览器,点击左上角浏览器窗口按钮,再点击“创建窗口”,在右侧代理设置里选择代理类型,其中可以选择HTTP或Socks5
2、根据NOVPROXY配置对应的“代理主机”、“代理端口”、“代理账号”、“代理密码”信息,点击“代理检测”会出现测试结果
3、点击确定按钮,主页会增加一条记录,点击右侧“打开”按钮则会开启一个新的浏览器窗口
# Dolphin Anty如何使用NOVPROXY
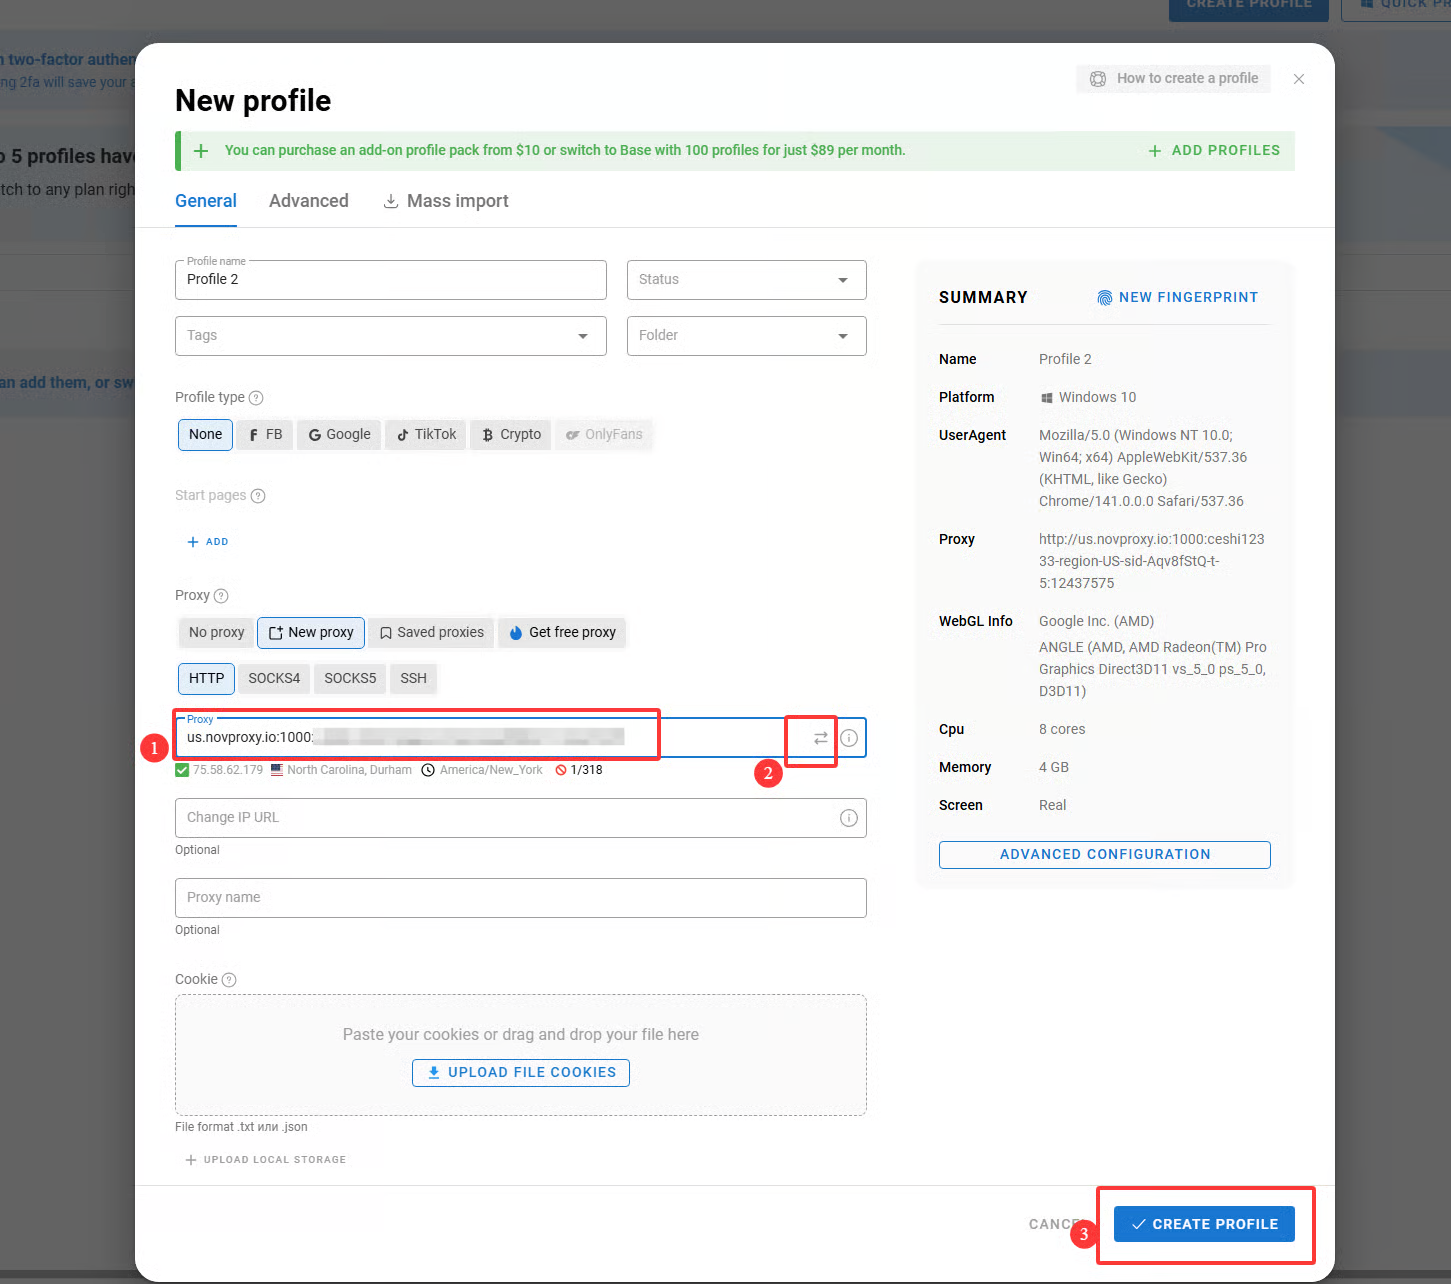
1、打开Dolphin Anty,点击“CREATE PROFILE”,弹出New profile弹窗
2、点击“NEW PROXY”,其中可以选择HTTP、HTTPS、SOCKS5
3、根据NOVPROXY配置对应的“代理主机”、“代理端口”、“代理账号”、“代理密码”信息,点击“Check connection”会出现测试结果。再点击“√CREATE PROFILE”,主页会增加一条记录,点击“STEART”就会开启一个新的浏览器窗口
# Hubstudio如何使用NOVPROXY
1、打开Hubstudio,点击“新建环境”,在代理信息里选择代理类型,其中可以选择HTTP、HTTPS或Socks5
2、根据NOVPROXY配置对应的“代理主机”、“代理端口”、“代理账号”、“代理密码”信息,点击“检查代理”会出现测试结果
3、点击完成按钮,主页会增加一条记录,点击右侧“打开”按钮则会开启一个新的浏览器窗口
# 拉力猫如何使用NOVPROXY
1.进入Novproxy仪表盘。
2.选择你想要的IP类型(这里以动态流量为例)。
①配置IP条件:选择相对应的国家、州省、会话类型、主机端口、用户名;
②选择生成格式和数量
③点击“生成”
④点击复制
这样就完成了Novproxy代理IP的获取。
3.打开拉力猫浏览器,点击“新建浏览器”,再在右侧输入显示名称,最后代理设置选择HTTP(支持HTTP(S)/SOCKS5)。
4.①把从Novproxy获取的代理IP信息(“IP地址”、“端口”、“账号”、“密码”)粘贴到拉力猫浏览器,
②再点击“检查网络”,可以看到该IP信息,
③最后点击“保存”,配置完成即可使用。
# Undetectable指纹浏览器如何使用 NOVPROXY
1.登录 Novproxy 官方网站。如果您尚未拥有账号,请完成注册流程。
2.①请从左侧菜单栏中选择已购买的代理 IP 。
② 接下来,设定目标国家、州/省、城市、会话类型、主机端口、用户名,并选择所需的格式。
③点击 \[生成] 。
④点击\[复制]按钮后,您便能够获取到该 IP 的主机名、端口号、账号及密码信息。
3.登录“Undetectable浏览器”(请输入您的账号和密码进行登录)。如果您尚未拥有账号,请完成账号注册流程。
4.登录后:
①点击\[New Profile];
②修改名称;
③点击\[main]图标;
④Proxy选择New proxy选项;
⑤选择所需的代理类型:HTTP (Novproxy 还支持 HTTP/S 和 SOCKS5 代理类型),
将您从Novproxy复制的 IP 数据信息粘贴到输入框中;
⑥点击右侧的检测按钮,您就会看到您的 IP 信息显示在下方。
5.检测完成后,点击\[Create]就完成了代理的配置,点击\[Open]打开您所配置的代理窗口,然后您就可以使用了。
# 如何在Xlogin指纹浏览器中配置NovProxy
[NovProxy](https://novproxy.com/?kwd=zz-tutorial) 是一家专注于提供高质量海外代理服务的工具平台,主要面向跨境电商、社交媒体运营、数据采集等场景。它支持 HTTP、HTTPS、SOCKS5 等多种代理协议,并提供来自全球多地区的住宅 IP 和数据中心 IP,使用户能够在国际网络环境中稳定、匿名地访问目标网站。
Xlogin 是一款专为多账号运营场景打造的 反检测指纹浏览器,通过模拟真实的浏览器指纹特征,让用户能够在同一设备上安全、独立地管理多个账号,而不会触发平台的风控检测。
1.登录并注册[NovProxy](https://novproxy.com/?kwd=zz-tutorial)
2.下载并安装 Xlogin(支持免费试用)
Xlogin官方的下载地址为:
2.1按照Xlogin的使用步骤,需要先订阅套餐,然后点击新建浏览器配置文件。
2.2点击【新建浏览器配置文件】后我们可以看到出现一个新弹窗,在设置好显示名称、备注信息之后,点击下图中的【设置代理服务器】的按钮。
2.3代理服务器设置弹窗中显示了代理类型、IP地址、端口、登录用户、登录密码等信息。要开启启用代理服务器,并将辣椒HTTP中的提取的代理信息粘贴到对应的矩形框中。
2.4点击启用代理服务器
2.5Xlogin支持多种代理类型,包含HTTP、Socks4、Socks5、HTTPS等协议,我们这里选择SOCKS5可以适用于绝大部分的代理协议,并且有更好的匿名性。
2.6返回[NOVProxy](https://novproxy.com/?kwd=zz-tutorial),将提取到的代理协议账密信息复制过来。
2.7复制后,不需要我们逐个填写,我们可以直接点击一下Xlogin中的【粘贴代理信息】按钮,被复制的账密命令将会自动拆分填写到对应位置中。
2.8填写完毕后,点击测试代理,如果出现绿色的弹窗提示并且展示了详细的IP信息则说明提取的IP可以正常使用,反之则说明线路连接不通需要更换一个代理。
2.9设置完毕后点击保存配置,即可完成浏览器的代理设置了。
# 如何在浏览器使用代理
[如何在Google Chrome中使用代理](/help-center/help-center/browser/google-chrome)
[如何在火狐浏览器中使用代理](/help-center/help-center/browser/firefox)
# 如何在Google Chrome中使用代理
1、先点击右上角三个点,再点击设置
2、点击系统,再点击打开您计算机的代理设备选项
3、跳转到了电脑设置中的代理,①打开使用代理服务器开关②输入从Novproxy获取的主机名和端口③点击保存
# 如何在火狐浏览器中使用代理
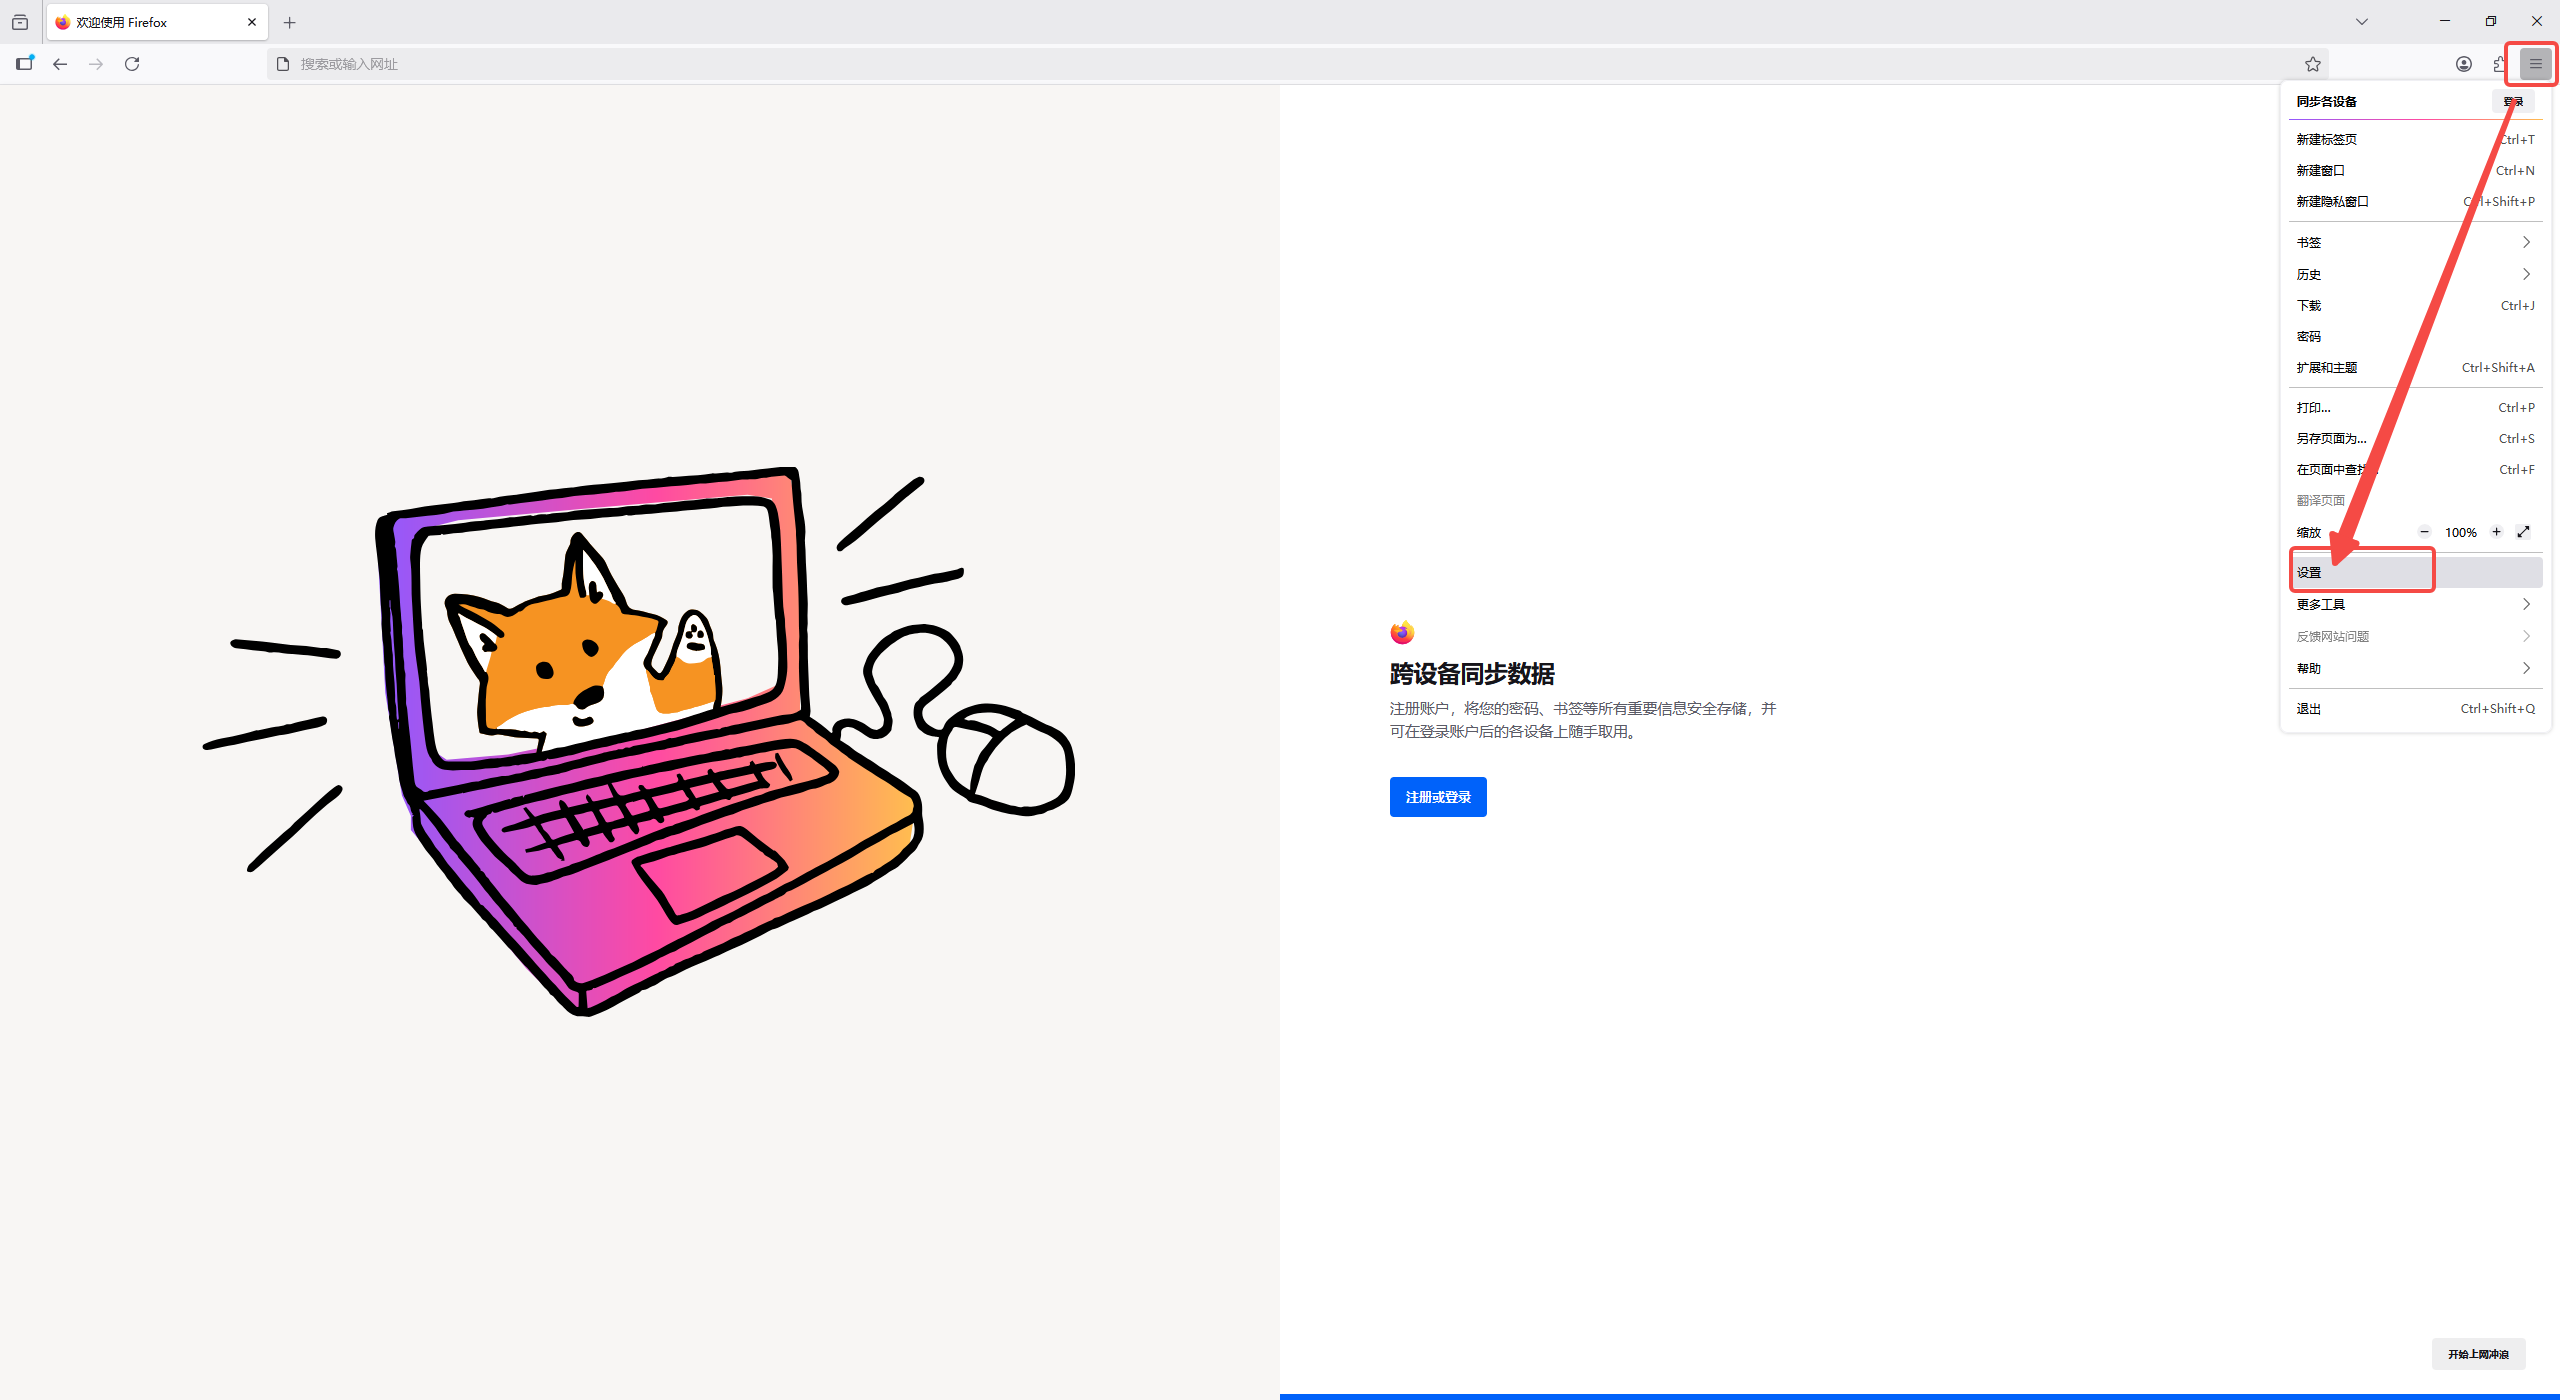
1、点击设置图标,在点击设置
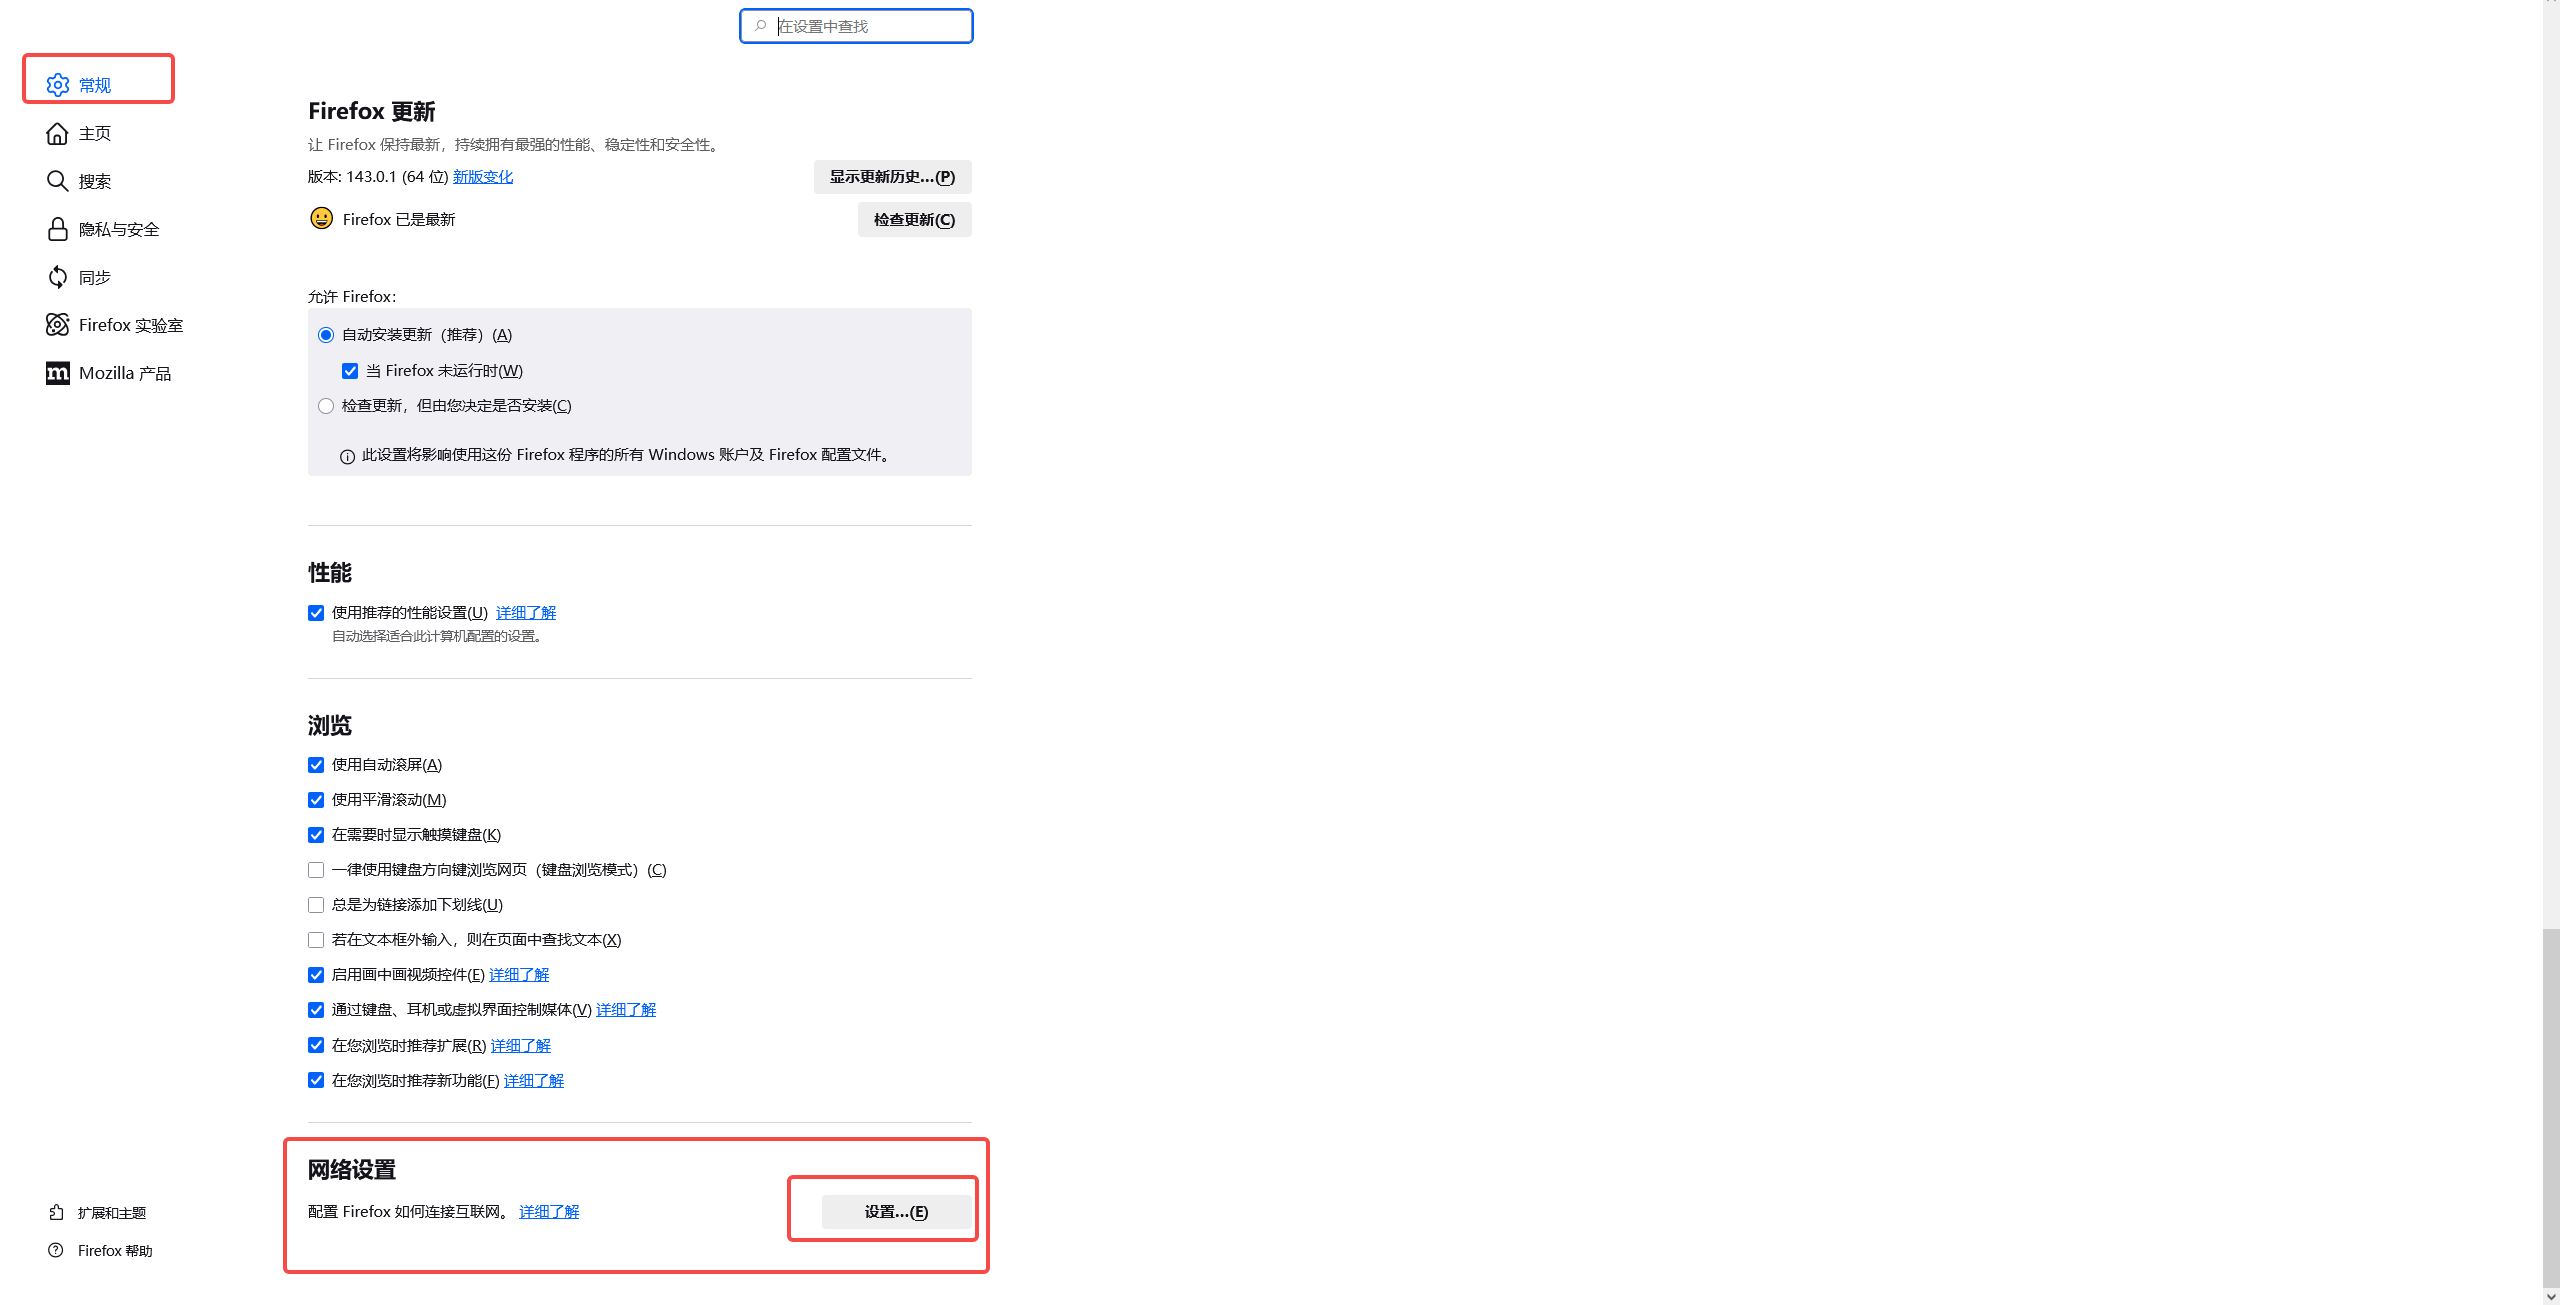
2、在常规选项中往下滚动,找到网络设置,点击设置
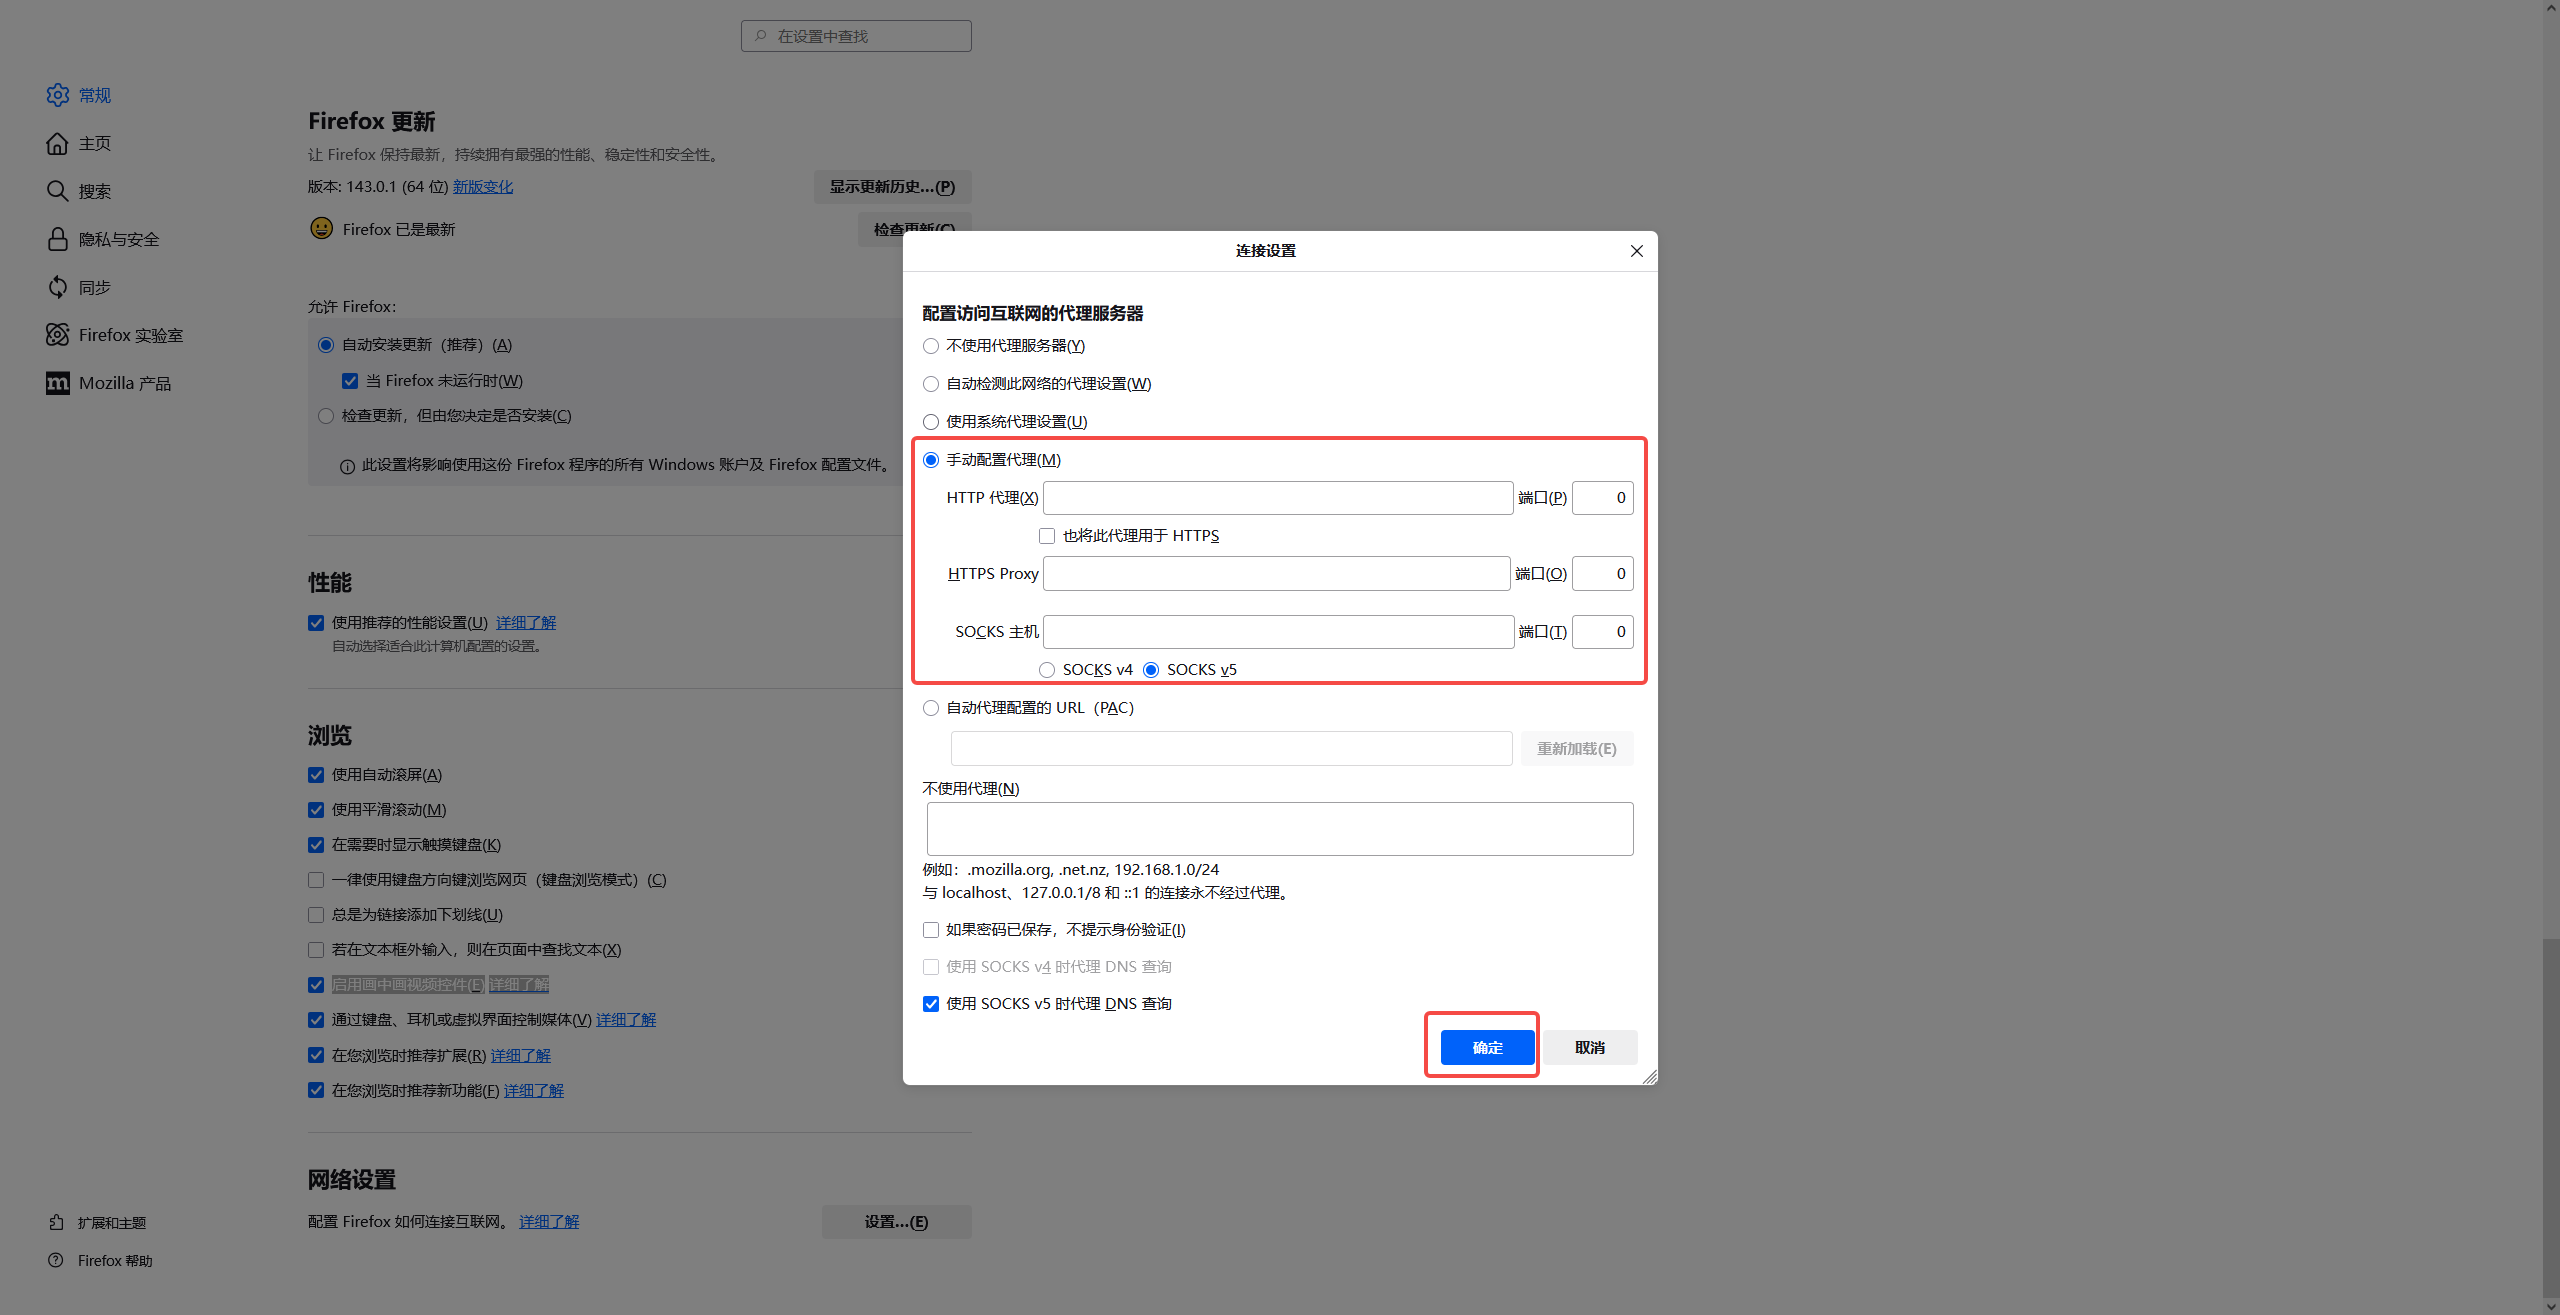
3、选择手动配置代理,将从Novproxy获取的主机名,端口填入 HTTP(或SOCKS) 代理字段,点击确定
# 短效住宅IP使用教程
# 账密模式
1、进入操作台(Dashboard),点击菜单短效住宅IP-账密模式
2、选择相对应的国家/地区、州省、城市、ASN,点击查询IP池,列表里会显示符合条件的IP
3、提取IP:点击列表里的提取按钮即可成功提取IP,或者选中多个IP点击批量提取按钮进行批量提取
4、使用IP:在【使用列表】选择格式后,点击复制使用,IP 过期后【使用列表】不再显示
# API模式
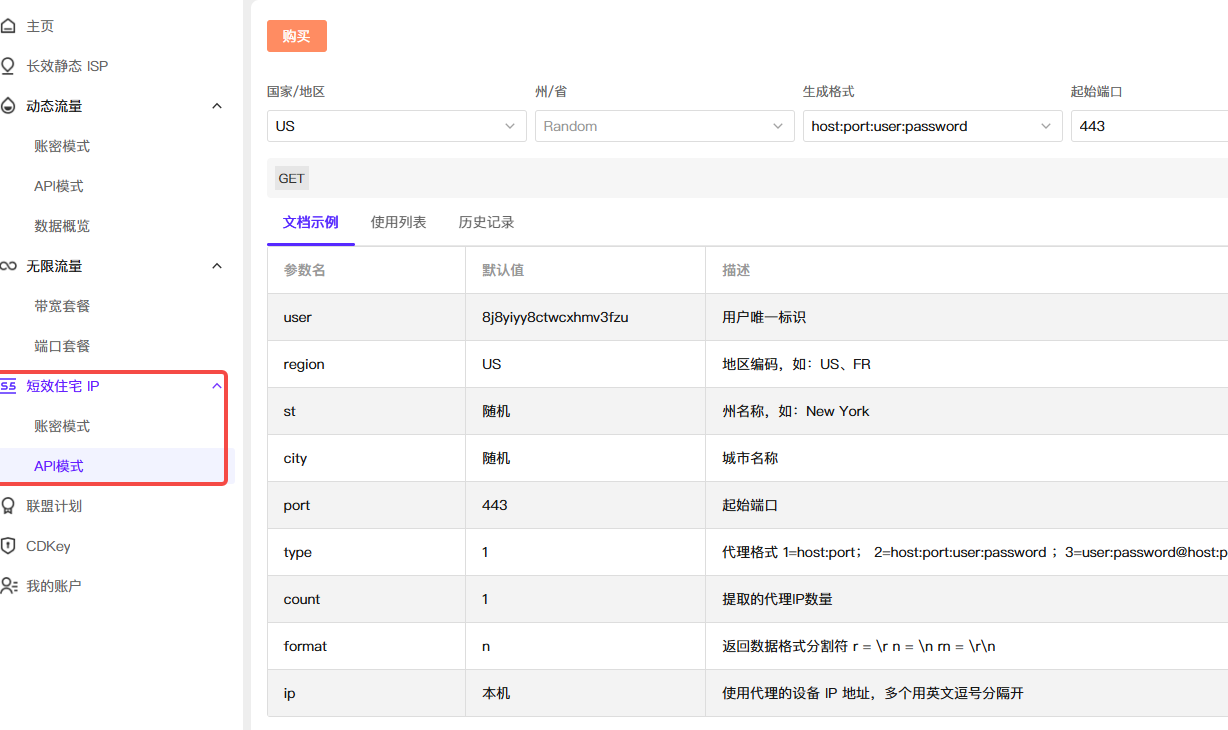
1、进入操作台(Dashboard),点击菜单短效住宅IP-API模式
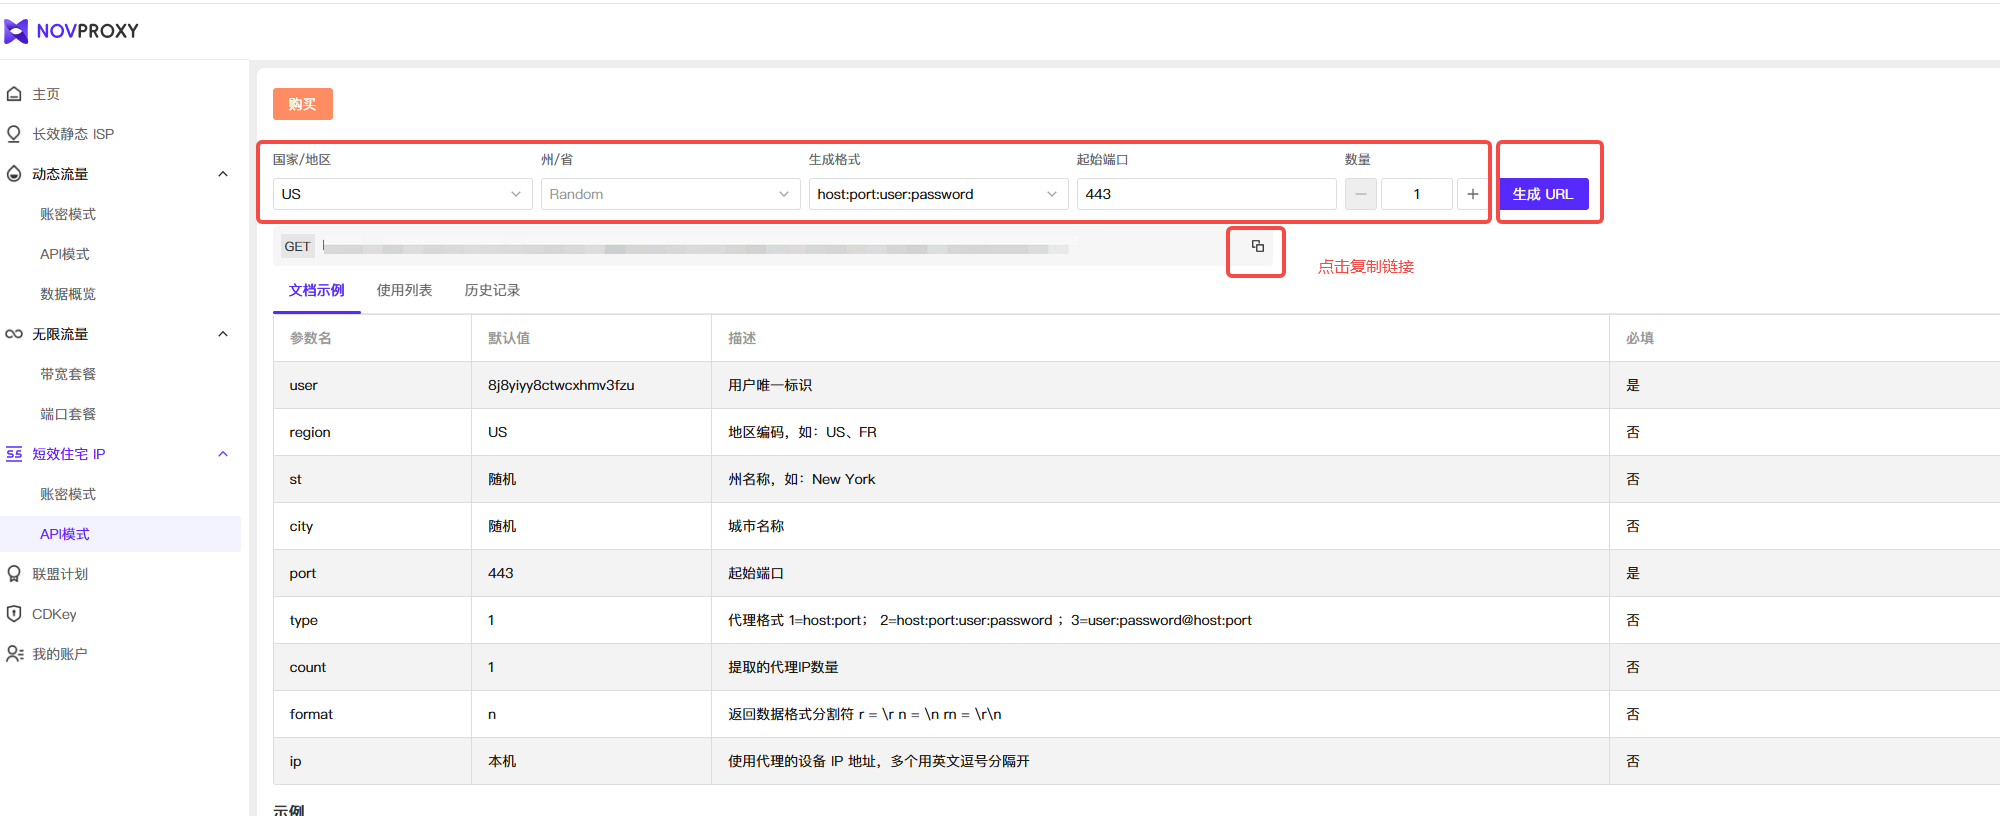
2、选择需要的国家/地区、州省、生成格式、输入起始端口、选择数量后,点击生成URL按钮,再点击复制按钮,即可复制链接使用
# Overview
Welcome to use NOVPROXY
As a professional global IP service platform, [NOVPROXY](https://novproxy.com/zh/) is committed to providing users with highly anonymous and secure network IP solutions. Its core advantages include:
\- Smart IP IP pool: Dynamically covering IP resources from multiple regions around the world
\- Full-scenario adaptation: Precisely matching the needs of data collection, social account management, market research, and other business requirements
\- Security protection system: Effectively avoiding ban risks through technologies such as IP rotation
\- Developer-friendly: Offering standardized API interfaces to support quick integration
NOVPROXY offers a variety of package types for users to choose from: [dynamic traffic](https://novproxy.com/zh/pricing/residential-ip/), [long-term static ISP](https://novproxy.com/pricing/isp/), [unlimited traffic - port](https://novproxy.com/pricing/unlimited-ip/?type=2), and [unlimited traffic - bandwidth](https://novproxy.com/pricing/unlimited-ip/?type=1).
# Dynamic Traffic Usage Tutorial
You can save a lot of traffic costs by subscribing to the discounted traffic packages.
[Account and password mode](/dynamic-traffic-usage-tutorial/zhangmi)
[API model](/dynamic-traffic-usage-tutorial/api)
# Account and password mode
1\. Enter the operation console (Dashboard), and click on the menu "Dynamic Traffic - Account Key Mode"
2\. Select the corresponding country, state/province, conversation type, etc. Among the conversation types, there are two: Sticky IP (sticky IP) and Rotating IP (rotating IP).
Sticky IP: The destination IP will not change within the specified time. After exceeding the set time, the IP will automatically be changed to another IP under the same conditions. The same IP address can support a session for up to 120 minutes.
Rotating IP: Each request will use a new IP to access the destination address.
3\. Select the forwarding machine (host name: port) and the username. Different regions' forwarding machines have different effects on the IP performance. Generally, choose the region that is closer to the destination IP or the region that is closer to the location of the user using the IP.
4\. After setting up the forwarding machine and the username, you can test whether it works properly by running the test command below in the "Command Prompt".
5\. When using, simply copy the necessary host: port, username, and password information required for the IP and configure it in the fingerprint browser or a program that supports HTTP or Socks5 IP. Alternatively, you can directly generate specific format proxies and paste them into the fingerprint browser, which will automatically adapt.
If you consider running multiple instances concurrently, you can set up multiple IP information based on the actual scenario. Unused ones will not incur additional charges.
6\. Sub-account Settings
Under the actual requirements such as high-concurrency task execution, multiple scenarios, and employee management, the logic of sub-accounts becomes particularly crucial.
When creating sub-accounts based on business needs, the following points should be noted:
* The account passwords must be 6-22 characters long and include a combination of numbers and letters.
* The allocated traffic must not exceed the remaining total traffic of the current account.
* To avoid account loss or theft, it is recommended to change the sub-account information regularly.
* The sub-account uses the username option in the settings.
# API mode
1.Enter the operation console (Dashboard), and click on the menu "Dynamic Traffic - API Mode" .
2.Add the local IP or the IP address that requires authorization to the whitelist. You can click \[One-click Add to Whitelist] to quickly add the local IP. Or click \[Whitelist List], then click \[Add to Whitelist], enter the IP address that requires authorization, and click \[OK].
3.After configuring the country/region, return format, conversation type, and extraction quantity, simply click \[Copy] to use it. Click \[Open the link], and you will be able to view the returned IP in the browser.
# Long-term Static ISP Usage Guide
A static IP is a fixed IP address that does not change.
1\. Enter the control panel (Dashboard), click on the menu Long-term Static ISP, and you can see the purchased static IPs. If there are none, please purchase first.
2\. To use it, you need to extract the IP first, as shown in the figure.
3\. The extracted IP addresses will appear in the usage record below. Click "Use", select the format of the account and password you want to copy, and click the "Copy" button to copy the IP:port, username, and password to the clipboard. Then, paste them into the fingerprint browser or a program that supports HTTP or Socks5 IP to start using them.
# Unlimited Traffic Usage Tutorial
Unlimited use of residential IPs, no restrictions on traffic or IP quantity. No need to worry about how much traffic is consumed, reducing the cost of data scraping.
NOVPROXY supports two modes:
1. [Bandwidth package](/unlimited-traffic-usage-tutorial/bandwidth-package)
2. [Port package](/unlimited-traffic-usage-tutorial/port-package)
# Bandwidth package
Randomly allocated to countries worldwide, customizable IP validity period, fixed bandwidth usage, machine configuration is allocated based on bandwidth.
**Account and password mode**
1\. Enter the operation console (Dashboard), click the menu Dynamic Traffic - Bandwidth Package, and you can see the purchased packages.
2\. Select the required hostname: port, country/region, session type. Among them, the session types include Sticky IP (sticky IP) and Rotating IP (rotating IP) with two types.
Sticky IP (sticky IP): The destination IP will not change within the specified time. After exceeding the set time, the IP will automatically be changed to another IP under the same conditions. The same IP address can support a session duration of up to 120 minutes.
Rotating IP (rotating IP): Each request will use a new IP to access the destination address.
3\. After the settings are completed, you can test whether it can be used normally by running the test command below in the "Command Prompt".
4\. When using it, simply copy the necessary host name, port, username, and password information required for the IP and configure it in the fingerprint browser or any program that supports HTTP or Socks5 IP.
# Port Package
You can choose the IP of a specific country, with a retention time range of 3 to 30 minutes.
**Account and Password Mode**
1\. Enter the operation console (Dashboard), click on the menu Dynamic Traffic - Port Package, and you can see the purchased ports.
2\. Click "Edit", set the required username, password, country/region, rotation cycle, and format, and then click "Confirm Modification"
3\. During use, you can copy the host name: port, username, password or the IP command, and paste it into the fingerprint browser or any program that supports HTTP or Socks5 IP.
**White list mode**
1\. Click on the white list mode
2\. Click "Edit", enter the IP addresses that need to be authorized (support batch addition; multiple IPs should be separated by commas), and then click "Save"
3\. The added whitelist IPs do not require verification of usernames and passwords. They can be used directly by simply configuring the hostname and port.
# How to use the Fingerprint Browser
The Fingerprint Browser is a tool designed to protect user privacy, mask online behavior, or bypass certain restrictions. Its core concept is the Browser Fingerprint, which is a "fingerprint" generated based on some unique information of the browser and device (such as device model, operating system, browser version, language, screen resolution, etc.), allowing for the unique identification of the user. The main function of the Fingerprint Browser is to forge or conceal the user's real browser fingerprint, thereby achieving the purpose of protecting privacy and avoiding tracking.
[AdsPower Fingerprint Browser](/fingerprint-browser/adspower)
[Bit Browser](/fingerprint-browser/bite)
[Dolphin Anty](/fingerprint-browser/dolphin)
[Lalicat](/fingerprint-browser/lalicat)
[Undetectable Fingerprint Browser](/fingerprint-browser/undetectable)
[Xlogin](/fingerprint-browser/xlogin)
# How to use NOVPROXY with AdsPower Fingerprint Browser
1\. Open AdsPower, click on the "New Browser" button on the top left corner. Then, in the right IP information column, select the IP type. You can choose either HTTP or Socks5.
2\. Based on the corresponding "Host: Port", "IP Account" and "IP Password" information configured in NOVPROXY, click "Check IP" and the test results will be displayed.
3\. After adding the environment, a new record will be added to the homepage. By clicking the "Open" button on the right, a new browser window will be opened.
# How to Use NOVPROXY in Bit Browser
1\. Open Bit Browser, click the browser window button in the upper left corner, then click "Create Window". In the IP settings on the right side, select the IP type, where you can choose HTTP or Socks5.
2\. Configure the corresponding "IP Host", "IP Port", "IP Account", and "IP Password" information based on NOVPROXY. Click "IP Detection" and the test result will be displayed.
3\. Click the "Confirm" button, and a new record will be added to the home page. Click the "Open" button on the right to open a new browser window.
# How to use NOVPROXY with Dolphin Anty
1. Open Dolphin Anty, click on "CREATE PROFILE", and a "New profile" window will pop up.
2. Click on "NEW PROXY", from which you can select HTTP, HTTPS, or SOCKS5.
3. Based on the corresponding "Proxy Host", "Proxy Port", "Proxy Account" and "Proxy Password" information configured in NOVPROXY, click "Check connection" and the test result will appear. Then click "√CREATE PROFILE", a new record will be added to the homepage. Click "STEART" and a new browser window will be opened.
# How to use NOVPROXY on the Lalicat
1.Enter the Novproxy dashboard.
2\. Select the type of IP you want (in this case, dynamic traffic).
① Configure IP conditions: Choose the corresponding country, state/province, session type, host port, and username;
② Select the generation format and quantity
③ Click "Generate"
④ Click "Copy"
This will complete the acquisition of the Novproxy IP.
3.Open the Lianli Cat browser, click "New Browser", then enter the display name on the right side, and finally select HTTP (supporting HTTP(S)/SOCKS5) for the IP settings.
4.① Paste the IP information (including "IP address", "port", "account", and "password") obtained from Novproxy into the Lianli Mao browser.
② Then click "Check Network", and you can see the IP information.
③ Finally, click "Save", and the configuration is completed and you can use it.
# How to use Undetectable Fingerprint Browser with NOVPROXY
1.Log in to the official website of Novproxy. If you don't already have an account, please complete the registration process.
2.① Please select the purchased IP from the left menu bar.
② Next, set the target country, state/province, city, session type, host port, username, and choose the desired format.
③ Click \[Generate].
④ After clicking the \[Copy] button, you will be able to obtain the host name, port number, account and password information of this IP.
3.Log in to "Undetectable Browser" (please enter your account and password to log in). If you don't have an account yet, please complete the account registration process.
4.After logging in:
① Click \[New Profile];
② Modify the name;
③ Click the \[main] icon;
④ Select the New proxy option for Proxy;
⑤ Choose the desired IP type: HTTP (Novproxy also supports HTTP/S and SOCKS5 types);
Paste the IP data information copied from Novproxy into the input box;
⑥ Click the detection button on the right, and you will see your IP information displayed below.
5.After the detection is completed, click \[Create] to complete the configuration of the IP. Click \[Open] to open the configured IP window, and then you can use it.
# How to configure NovProxy in Xlogin fingerprint browser
[NovProxy](https://novproxy.com/?kwd=zz-tutorial) is a tool platform dedicated to providing high-quality overseas proxy services, primarily designed for scenarios such as cross-border e-commerce, social media operations, and data collection. It supports multiple proxy protocols including HTTP, HTTPS, and SOCKS5, and offers residential and datacenter IPs from various global regions. This allows users to access target websites within an international network environment in a stable, anonymous, and reliable manner.
Xlogin is an anti-detect fingerprint browser specifically built for multi-account operation scenarios. By simulating real browser fingerprint characteristics, it enables users to safely and independently manage multiple accounts on the same device without triggering platform risk-control detection.
1.Log in and register on [NovProxy](https://novproxy.com/?kwd=zz-tutorial)
2.Download and Install Xlogin(Support Free Trial)
The official Xlogin download link is:
2.1 You need to subscribe to a plan first according to Xlogin’s usage steps, and then click “Create New Browser Profile.”
2.2 After clicking “Create New Browser Profile,” a new pop-up window will appear.
Once you have set the display name and remark information, click the “Set Proxy Server” button shown in the image.
2.3 Paste the proxy details extracted from [NOVProxy](https://novproxy.com/?kwd=zz-tutorial)
In the proxy server settings pop-up window, you will see fields such as proxy type, IP address, port, username, and password.Enable the proxy server option, then paste the proxy details extracted from NovProxy into the corresponding fields.
2.4 Click “Enable Proxy Server”
2.5 Select SOCKS5
Xlogin supports multiple proxy types, including HTTP, Socks4, Socks5, and HTTPS. Here, we select SOCKS5 because it is compatible with most proxy protocols and provides better anonymity.
2.6 Return to [NovProxy](https://novproxy.com/?kwd=zz-tutorial) and copy the extracted proxy credential information into Xlogin.
After copying, there's no need to fill in each field manually. Simply click the “Paste Proxy Info” button in Xlogin, and the copied credential string will be automatically parsed and filled into the corresponding fields.
2.7 After completing the setup, click “Test Proxy.”
If a green popup appears and displays detailed IP information, it means the extracted IP is working properly. Otherwise, the connection has failed, and you will need to switch to another proxy.
2.8 Click “Save Configuration” to finish
After completing the setup, click “Save Configuration” to finish the browser’s proxy configuration.
# How to use IP in the browser
[How to Use IP in Google Chrome](/browser/google-chrome)
[How to Use IP in Firefox](/browser/firefox)
# How to Use IP in Google Chrome
1\. First, click the three dots on the top right corner, then click Settings.
2\. Click System, and then click Open the IP device options for your computer.
3\. Switched to the IP settings in the computer settings. ① Turn on the IP server switch ② Enter the hostname and port obtained from Novproxy ③ Click Save.
# How to Use IP in Firefox
1\. Click the settings icon, then click Settings.
2\. Scroll down in the General Options, find Network Settings, and click on Settings.
3\. Select Manual IP Configuration, fill in the Host Name and Port obtained from Novproxy into the HTTP (or SOCKS) IP fields, and click OK.
# Short-Term Residential IP
# Account and password mode
1\. Enter the operation console (Dashboard), and click on the menu "Short-Term Residential IP- Account and password mode"
2.Select the corresponding country/region, state/province, city, ASN, click on "Query IP Pool", and the list will display the IPs that meet the criteria.
3.Extract IP: Click the "Extract" button in the list to successfully extract the IP, or select multiple IPs and click the "Batch Extract" button to perform batch extraction.
4.Using IP: After selecting the format in the "Usage List", click "Copy". Once the IP expires, the "Usage List" will no longer display.
# API mode
1\. Enter the operation console (Dashboard), and click on the menu "Short-Term Residential IP- API Mode"
2.Select the desired country/region, state/province, generation format, input starting port, and the quantity to be selected. Then click the "Generate URL" button, followed by the "Copy" button. You can then copy the link for use.